By Steve Heiting
People love posting video of their fish catches on social media, almost to the point of it being an annoyance. Really, how often do we have to watch someone catch a three-pound bass while using terms like “epic” or “insane” in an attempt to get you to watch? And what about the kid who’s barely shaving releasing a video of his “Top Five Lures Of All Time”?
Even if you don’t dream of being a social media influencer, you should consider filming your fishing outings. Not only is it a fun way to relive the excitement of catching a big fish, but the camera is an impartial observer that can help you become a better angler. Cast a critical eye at the footage your camera produces and you will not only see what you did right but — more importantly — what you may have done wrong.

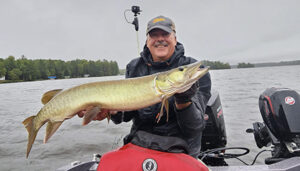
Never before has it been so easy to film your fishing outings, and I say that after nearly 25 years of filming on the water. I produced five instructional musky fishing DVDs back when that medium was still popular, and two years ago I launched a YouTube channel with short tips segments for musky fishermen.
In order to get good fishing footage, you need to run a camera all the time. Even the best fishing pros don’t always know when fish will bite, and if you wait until one does before you turn on the camera, you’ve already missed the strike. Most fishing shows on television employ videographers whose camera is constantly running, but such expense is impractical for the rest of us.
Thankfully, waterproof, fairly durable action cameras are available everywhere and produce crisp, high definition video, with passable audio, which can be improved by adding a shotgun microphone. As common as the little cameras have become, they present many challenges.
First, there’s the matter of being overwhelmed by footage. It can be a lengthy process to review hours of video to find the moment when something actually happened while fishing. Fortunately, cameras today are equipped with “loop mode,” which continuously captures footage while overwriting earlier footage. I set my cameras on a five-minute loop — when I press a button to save footage, the camera will retain the last five-plus minutes of footage. Then, you simply press the button again to restart filming.
The second issue is small cameras have tiny batteries, and it’s disappointing to discover your camera stopped running right before you caught a fish. This can be solved by plugging the camera into an external battery pack, which is typically only slightly larger than a checkbook yet can power your camera for an entire day. Another way of powering an action camera is through your boat’s battery. A company called Yolotek (yolotek.com) offers a sturdy mount that plugs into your boat’s light socket(s). Flip the switch as if you were turning on your boat lights, and your camera will receive power to run all day.
Positioning your camera to produce great footage isn’t as easy as it sounds. The only downside I’ve seen to the Yolotek mount is it cannot be moved around the boat, so it produces only a static viewpoint. Some anglers like to strap a camera to their head for point-of-view footage, but as the camera turns with their head the resulting footage can be dizzying for the viewer. Others will use straps that affix the camera to their chest, but this footage can also be difficult to watch.
Fortunately, with a battery pack and a long enough power cord, camera mounting locations in the boat are limited only by your imagination. Attach a camera to a selfie stick and clamp it to a suction cup mount, and you can place a camera almost anywhere in your boat. Side rails or track systems on the boat can also be employed. If you want the camera to have a higher viewpoint, mount it to an inexpensive, extending fiberglass pole such as those used by painters. The pole must be affixed to the boat in some way and some jerry-rigging may be required to stabilize it.
Some fishermen even take the high angle idea to the extreme by employing a camera-carrying drone above their boat. How many cameras you use is up to you. Footage from a single camera is better than none, but two cameras will improve your final product. A third might be handy, but as your camera layout increases you’ll find they start to get in the way.
Once a fish is in the net and you want to hold it up for the camera, I believe nothing beats the video quality produced by today’s cellphones. In fact, I’ve sold the high definition cameras I used for this purpose in favor of my newest cellphone. My phone is always within reach and the video quality superb.
Editing your video can seem challenging at first, but like anything becomes easier with experience. Computers with Apple or Microsoft operating systems come with video editing software bundled in, and you can purchase applications with more features from a number of sources. Using the software to embed transitions between video segments makes them more eye-appealing, and background music can be added as well. You can then export the video in high definition format to watch on a television if you so choose, or reduce its file quality (and file size) to take up less storage space on your computer or cellphone.
Being able to relive your fishing experiences through video is a wonderful way to keep memories alive and share them with others. I’ve also become a better fisherman by watching myself in action. Not everybody wants to make the effort of filming their fishing outings, but I’m glad I’ve taken the plunge.
